


How to Cut Compact Laminate: Essential Techniques for Clean, Professional Results

Cutting Compact laminate properly requires the right tools, techniques, and safety measures to achieve clean edges without damaging this dense material. Whether you're installing countertops, wall panels, or furniture components, mastering these cutting methods ensures professional results every time.
Compact laminate's high density and resin content make it more challenging to cut than standard materials, but following proven techniques delivers excellent outcomes for any project.
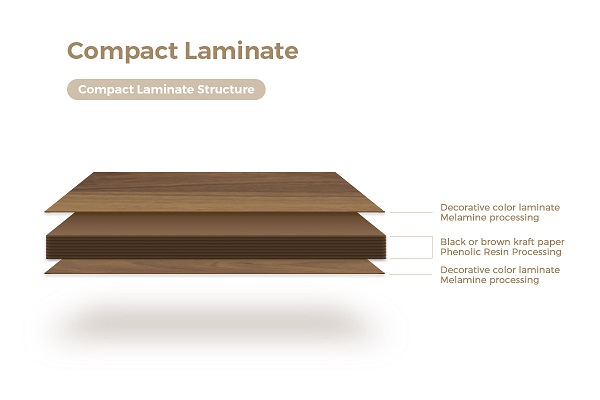
Key Takeaways
• Choose the right blade: Fine-tooth carbide or diamond blades prevent chipping and ensure smooth cuts in compact laminate.
• Support the material: Proper support on both sides of the cut line prevents cracking and binding during cutting operations.
• Control cutting speed: Medium speeds prevent overheating while maintaining clean cut quality.
• Plan your cuts: Measure twice, cut once - Compact laminate mistakes are difficult to fix.
• Safety first: Always wear protective equipment and ensure adequate ventilation when cutting.
Essential Tools for Cutting Compact Laminate
Manual Cutting Tools
Score-and-snap methods work effectively for Compact laminate sheets under 6mm thick. Use a sharp utility knife with a metal straightedge, making multiple passes to score approximately half the material thickness before snapping. This technique provides excellent control for straight cuts and requires minimal equipment.
Professional laminate scoring tools offer better leverage and consistency than standard utility knives. These specialized cutters feature hardened blades designed specifically for high-pressure laminate materials.
Power Tool Selection
Circular saws represent the most versatile option for cutting Compact laminate. Choose saws with adjustable depth settings and stable base plates. Variable speed controls help optimize cutting parameters for different material thicknesses.
Track saws excel for long, straight cuts and provide built-in dust collection. The guided cutting system ensures perfectly straight lines while the plunge-cutting capability allows for interior cutouts.
Jigsaws handle curved cuts and detailed work effectively. Select models with orbital action controls and tool-free blade changes for maximum flexibility during complex cutting operations.
Blade Specifications
Blade selection critically impacts cut quality in Compact laminate applications. Fine-tooth blades with 60-80 teeth per inch minimize chipping and produce smooth edges. Carbide-tipped teeth maintain sharpness longer than steel alternatives when cutting abrasive phenolic materials.
Triple-chip grind (TCG) tooth geometry handles dense materials effectively, while alternate top bevel (ATB) configurations reduce surface chipping. Choose blades specifically rated for laminate cutting to ensure optimal performance.
| Blade Type | Tooth Count | Material Thickness | Cut Quality | Blade Life |
Carbide TCG | 60-80 TPI | 6-25mm | Excellent | 300-500 cuts |
Diamond | 40-60 TPI | 12-25mm | Superior | 800-1200 cuts |
HSS Fine-tooth | 80-100 TPI | 2-8mm | Good | 150-250 cuts |
Carbide ATB | 60-80 TPI | 6-15mm | Very Good | 400-600 cuts |
Step-by-Step Cutting Process
Pre-Cutting Preparation
Mark all cut lines clearly using a fine-tip marker or scoring knife. Double-check measurements and use templates for complex shapes. Clean the work surface and ensure adequate lighting for precise cutting.
Set up proper material support using sawhorses or cutting tables. The entire sheet must be supported to prevent sagging or binding during cuts. Position supports close to cut lines without interfering with tool operation.
Making Straight Cuts
Position Compact laminate with the finished surface facing up when using circular saws. This orientation minimizes visible chipping on the decorative surface. Adjust blade depth to extend approximately 3mm beyond the material thickness.
Start cuts slowly, allowing the blade to reach full speed before contacting the material. Maintain steady forward pressure without forcing the cut. Let the blade do the work to prevent overheating and premature dulling.
Use a cutting guide or straightedge for long cuts to ensure accuracy. Clamp guides securely to prevent movement during cutting operations.
Curved and Interior Cuts
Drill starter holes for interior cutouts using sharp twist bits appropriate for the material thickness. Position holes at corners for rectangular cutouts, then connect with jigsaw cuts.
When making curved cuts, use smooth, continuous motions rather than forcing the tool. Allow the jigsaw blade to follow its natural cutting path for best results. Support cutout pieces to prevent them from dropping and causing tear-out.
Advanced Cutting Techniques
Router-based cutting provides the cleanest edges for premium installations. Use carbide or diamond-tipped bits with adequate cutting speed for the material density. Template routing ensures consistent results when cutting multiple identical pieces.
Water cooling during cutting operations reduces heat buildup and extends blade life. Continuous coolant application also improves surface finish quality in critical applications.
| Cutting Method | Equipment Required | Typical Speed | Material Thickness | Edge Quality Rating |
Circular Saw | Fine-tooth blade | 3000-4000 RPM | 6-25mm | Good (7/10) |
Track Saw | Guide rail system | 4000-5000 RPM | 8-20mm | Excellent (9/10) |
Router | Template guide | 18000-22000 RPM | 6-15mm | Superior (10/10) |
Jigsaw | Metal cutting blade | 1500-2500 SPM | 2-12mm | Fair (6/10) |
Score & Snap | Utility knife | Manual | 2-6mm | Good (7/10) |
Achieving Professional Cut Quality
Minimizing Chipping and Tear-Out
Apply painter's tape along cut lines to reduce surface damage, especially when using jigsaws or reciprocating saws. Remove tape immediately after cutting to prevent adhesive residue buildup.
Score the cut line lightly before making power tool cuts. This preliminary scoring helps control material fracture and reduces chipping at the surface level.
Managing Heat Generation
Extended cutting operations generate heat that can damage both tools and materials. Take regular breaks during long cutting sessions to allow cooling. Use compressed air to clear chips and reduce friction buildup.
Monitor blade temperature during cutting operations. Excessive heat indicates dull blades or inappropriate cutting parameters that require adjustment.
Edge Finishing Options
Most Compact laminate cuts require minimal finishing when proper techniques are used. Light sanding with fine-grit paper removes any minor roughness from cut edges.
For exposed edges in visible locations, consider edge banding or polishing treatments that match the surface finish. These treatments provide a professional appearance and protect the core material from moisture infiltration.
Troubleshooting Common Issues
Preventing Blade Binding
Blade binding occurs when material closes around the cutting tool during operation. Prevent binding by using appropriate blade depth settings and maintaining steady cutting speeds. Support both sides of the cut to prevent material movement.
Addressing Rough Cuts
Rough or chipped cuts typically result from dull blades, excessive cutting speed, or inadequate material support. Replace blades regularly and adjust cutting parameters based on material response.
Handling Difficult Materials
Some Compact laminate formulations cut more easily than others due to variations in resin content and density. Test cutting techniques on scrap material before proceeding with final cuts on expensive sheets.
Safety Considerations When Cutting
Always wear safety glasses and dust masks when cutting Compact laminate. Phenolic dust can irritate respiratory systems and eyes. Ensure adequate ventilation in work areas to remove airborne particles.
Workers must follow established safety protocols for power tools to prevent injuries. Secure loose clothing and jewelry before operating cutting equipment. Maintain clean work surfaces to prevent slipping hazards during operations.
Professional installations should comply with ANSI B11.0 machinery safety standards when using power equipment. Keep first aid supplies readily available and know proper emergency procedures for tool-related injuries.
Selecting Quality Materials and Expert Support
Professional results depend on both proper cutting techniques and material quality. Working with experienced suppliers ensures access to technical support and material specifications that optimize cutting outcomes.
When planning complex installations requiring precise cuts and tight tolerances, partner with a reliable HPL laminate manufacturer who understands fabrication requirements and can provide guidance on cutting techniques. HUAJIALE offers comprehensive technical support to help contractors achieve professional results in demanding applications.
Conclusion
Successfully cutting Compact laminate requires understanding material properties, selecting appropriate tools, and applying proven techniques consistently. Master these fundamentals to achieve professional results that meet quality standards while maintaining efficient project timelines.
Whether working on small repairs or large installations, proper cutting technique ensures Compact laminate projects deliver lasting performance and visual appeal.
Frequently Asked Questions
What blade type works best for cutting Compact laminate?
Fine-tooth carbide blades with 60-80 teeth per inch provide the cleanest cuts. Diamond-tipped blades last longer but cost more initially. Avoid coarse-tooth blades which cause excessive chipping.
How do you prevent chipping when cutting Compact laminate?
Use sharp blades, apply painter's tape along cut lines, and cut with the finished surface facing up. Support both sides of the cut line and maintain steady cutting speed without forcing the tool.
Can you cut Compact laminate with a utility knife?
Yes, for materials under 6mm thick. Make multiple scoring passes at about half the material thickness, then snap along a straightedge. This method works best for straight cuts only.
What safety equipment is required when cutting Compact laminate?
Always wear safety glasses and dust masks. Ensure adequate ventilation to remove phenolic dust particles. Follow federal safety guidelines for power tool operation.
How do you cut curves in Compact laminate?
Use a jigsaw with fine-tooth metal cutting blades. Drill starter holes for interior cuts, then follow smooth continuous motions. Support the material to prevent binding and vibration.
What causes rough or burned cuts in Compact laminate?
Dull blades, excessive cutting speed, or inadequate material support typically cause poor cut quality. Replace blades regularly and adjust cutting parameters based on material thickness and density.
How thick can Compact laminate be cut with standard tools?
Circular saws handle up to 25mm thickness effectively. Utility knives work up to 6mm. Jigsaws manage up to 12mm with proper blades. Router systems excel for precision work up to 15mm thickness.
Tags:
CATEGORIES:

 Contact Us
 Online Sales
 Case Study
 News Center
 Product Brochure


